Binnacle Repair
- Leigh Ping
-
 Offline
- Moderator
-

- Posts: 6838
- Thanks: 1631
That had never occurred to me. Thanks, it's always good to get a 'living review'. Look forward to seeing some pics of your next project.Tourbillon wrote: The only issue i had was the smell of paint lasted a long time, not unpleasant but always nagging.
Cheers.
Please Log in or Create an account to join the conversation.
Tourbillon wrote: ...Ready to start the next interior project now - The Lotus Elise Gearshift surround fitment.
T
:help: What does this look like?
The only one I found looks like .....
.... which really doesn't look like it would ever fit in the F/TF?
Please Log in or Create an account to join the conversation.
- Tourbillon
-
 Offline
Topic Author
- Qualified MGer
-

- Posts: 563
- Thanks: 209
I will keep you updated.
T
Please Log in or Create an account to join the conversation.
Please Log in or Create an account to join the conversation.
- WeekendMonkey
-
 Offline
- Journeyman MGer
-

- Posts: 66
- Thanks: 21
The cracked instrument binnacle is a common problem where the lugs securing the binnacle to the dash snap due to ageing and vibration, resulting in a noticeable rattle whenever you go over the slightest bump.
The binnacle is secured to the dash by three screws on the underside, which means to do a “proper job” the dash has to be removed to gain access to the screws. I was ready for a long haul and after removing the binnacle I prepared myself for removing the dash. The binnacle lugs are rather thin and any repair was certain to crack again given time. So I began to think about alternatives. It looked as though I could attach the binnacle from the top side of the dash, using metal lugs attached to the underside of the binnacle and flanged screws fixed into the top side of the dash. Initially I was planning for an interference fit (hence the foam rubber sandwiched into the folded lug in my photo), but on reassembly I realised that a it was possible to reach the screws with the binnacle in place, allowing them to be fully tightened.
This job can be completed without removing the steering wheel, but a stubby cross head screwdriver is a big help.
I started by removing the steering column cowl; two screws on the underside and one behind the fuse panel cover. Then I remove the instrument cluster surround, two screws on the underside of the top lip and two screws at the base, one either side of the steering column. This moulding can be lifted away to one side without disconnecting the controls.
The binnacle is fixed to the instrument cluster using five screws, three shorter ones fixing against the plastic moulding and two longer ones fix against metal lugs. At this point the binnacle can be lifted away. These photos show the snapped lugs on the underside and their remains attached to the dash.
I fashioned two lugs from thin steel (an old biscuit tin lid), which provides some helpful flexibility. The strips are four inches in length and about ¾ wide. The first inch is folded back to give double thickness and a ½ inch slot cut to take the screw (initially I put some foam rubber in the fold to allow compression for an interference fit). Finally I formed the lug into an ‘L’ shape.
Roughen the metal and the binnacle surface (the underside of my binnacle moulding was uneven and some flattening was required) and fix the lugs in place with epoxy. I mounted the lugs about 1½ inches each side of the centre line, and set slightly back from the edge. Hold in place with clamps until the glue is cured.
The dash is made of a soft composite that is not ideal for taking screws, so I made two 1 x 1 ½ inch brackets from aluminium and drilled pilot holes for a No. 10 flanged screw.
Hold the binnacle against the dash and using the original lugs as a guide to the correct position, mark centres for the two screw holes. Drill pilot holes for the screws and epoxy the brackets in place, using the screws to hold the bracket in place while the glue cures.
To fit the binnacle, slacken off the bracket screws and slide the slotted lugs in place. If you have small hands you can get inside the binnacle to tighten the screws, otherwise a log screwdriver will be required. The photo shows the lugs screwed to the dash viewed through the gap between the binnacle and the instrument cluster.
Finally reassemble the instrument surround and steering cowl using the reverse of the instructions above.
Now take her for a test drive and enjoy the rattle-free ride.
Please Log in or Create an account to join the conversation.
I'll certainly keep this post in mind when it comes time to demolish the cars interior.
I'd love to cover my dash in Oxford leather to match the seats etc.
Best wishes.
Ken
Sent from my iPad using Tapatalk HD
Please Log in or Create an account to join the conversation.
- Leigh Ping
-
 Offline
- Moderator
-

- Posts: 6838
- Thanks: 1631
Please Log in or Create an account to join the conversation.
- talkingcars
-
 Offline
- Moderator
-

- Posts: 6876
- Thanks: 1296
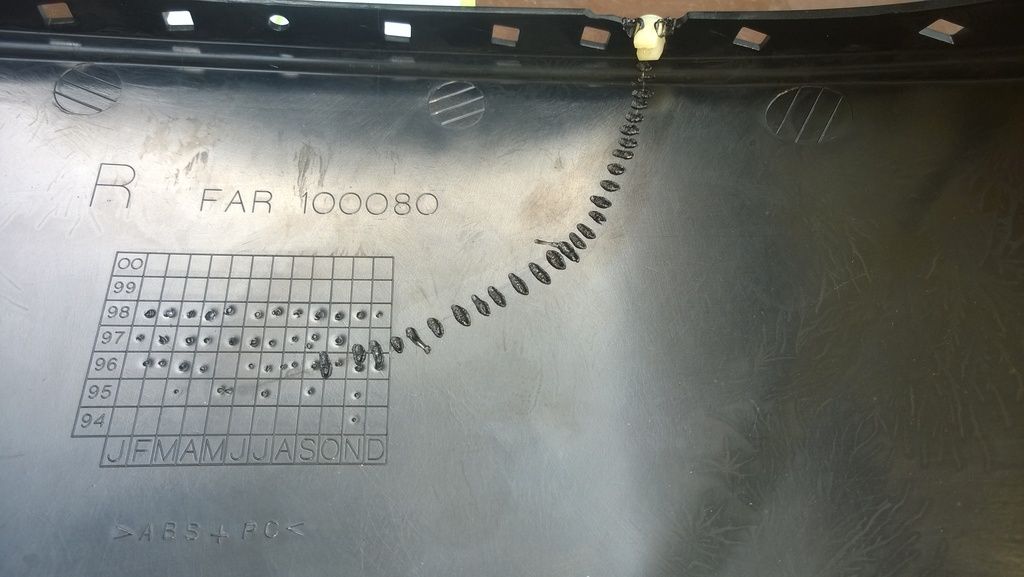
I plastic welded (using a soldering iron) a series of stiches.

It's not perfect but it'll do me.

Home to black Alfa Romeo 159 3.2 V6 Q4 ,green MGF VVC and red MG Maestro T16.
MG - the friendly marque.
Please Log in or Create an account to join the conversation.
- Leigh Ping
-
 Offline
- Moderator
-

- Posts: 6838
- Thanks: 1631
talkingcars wrote: I've just done a repair on the crack in my binnacle.
I plastic welded (using a soldering iron) a series of stiches.
It's not perfect but it'll do me.
That's a brilliant solution James. Nicely done. :broon:

Please Log in or Create an account to join the conversation.
- talkingcars
-
 Offline
- Moderator
-

- Posts: 6876
- Thanks: 1296
Home to black Alfa Romeo 159 3.2 V6 Q4 ,green MGF VVC and red MG Maestro T16.
MG - the friendly marque.
Please Log in or Create an account to join the conversation.
Please Log in or Create an account to join the conversation.
talkingcars wrote: I have virtually the same soldering kit but from Dermal.
Aldi has one on sale for 14.99 currently. click
Please Log in or Create an account to join the conversation.


