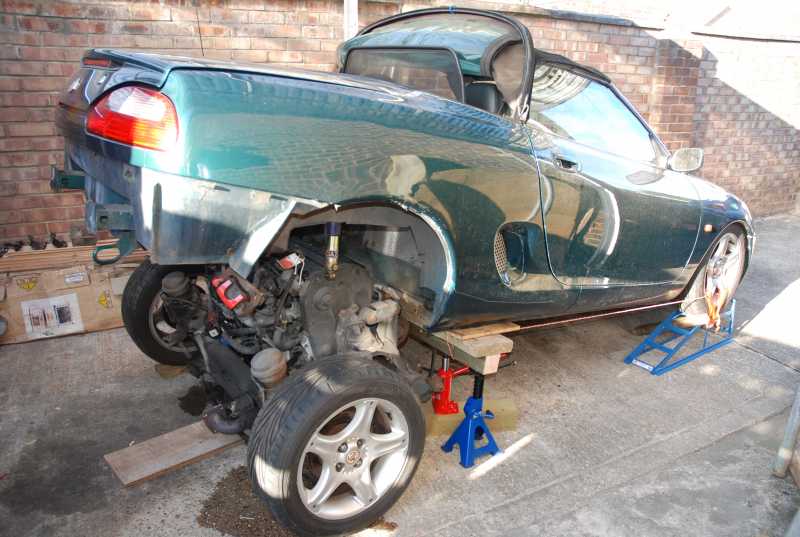
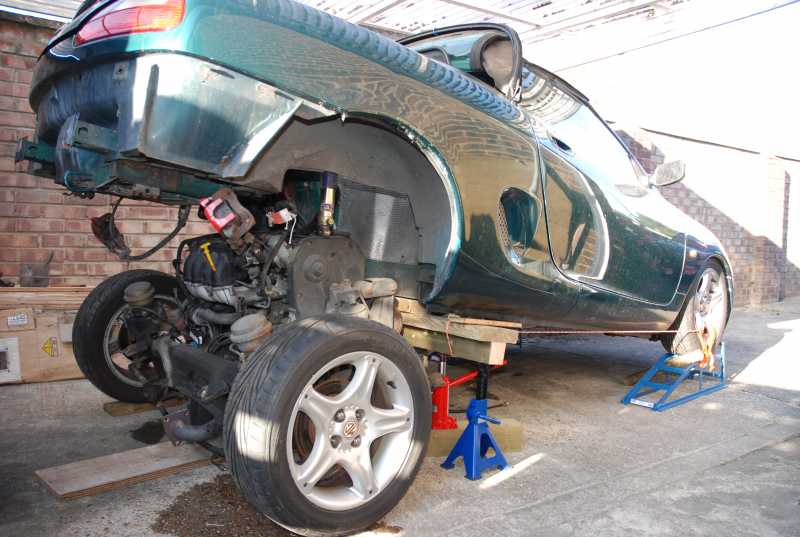
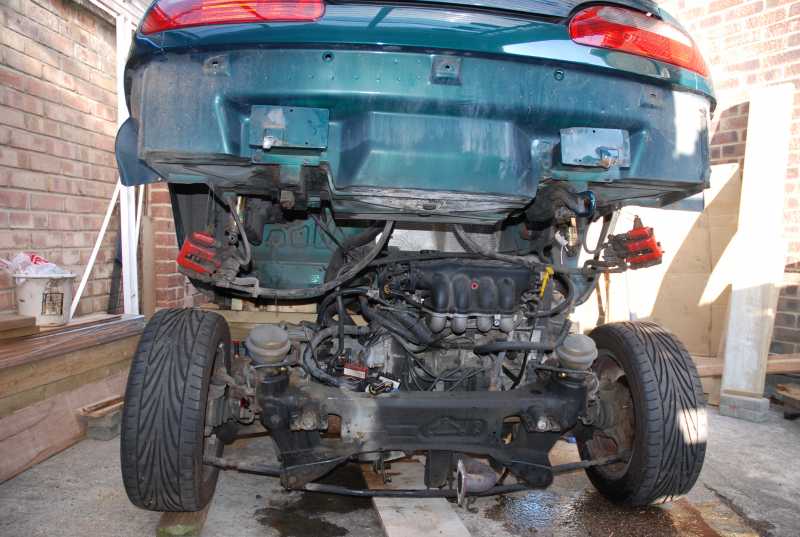
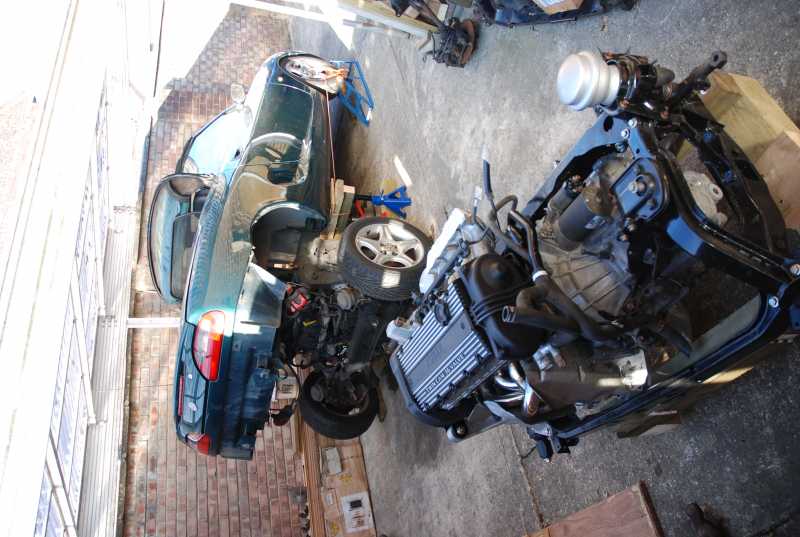
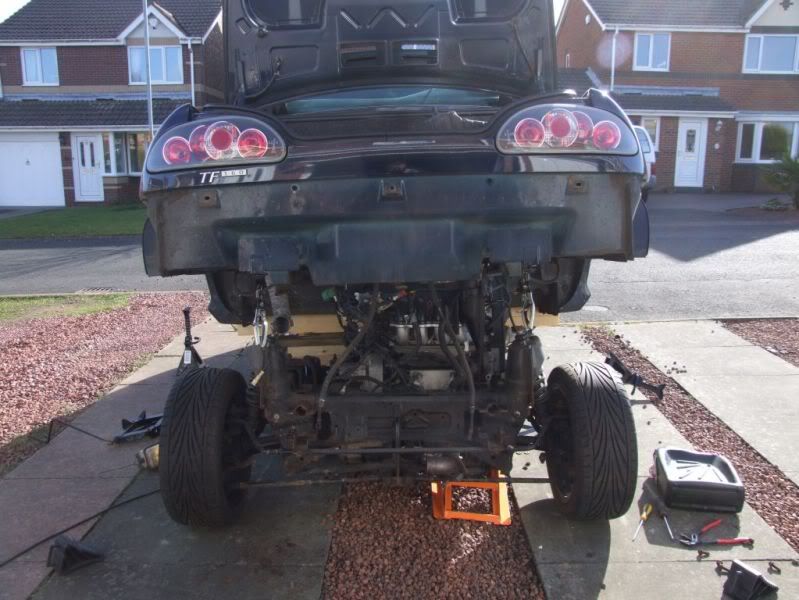
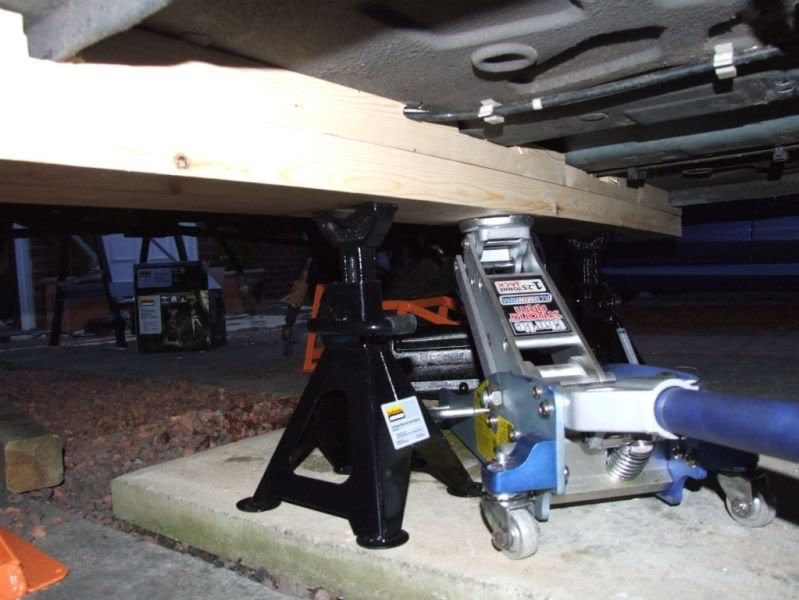
How I got mine up.
Please Log in or Create an account to join the conversation.
...and is the last pic a "here's one I prepared earlier" moment :lol: :dry:
Pete Vickerstaff
MG F/TF Central
- your one stop shop for MGF/TF tips, tricks, faq's, how to's and links
Please Log in or Create an account to join the conversation.
The wood looks familiar too.
http://the-t-bar.com/en/forum/22-cjjs-guides/382-enginerear-subframe-how-to-remove
Nice to see some pics of one of those sphere equiped ones.
Please Log in or Create an account to join the conversation.
Please Log in or Create an account to join the conversation.
Two bottle jacks were used, under the woodwork at the cill ends.
The woodwork comprised a scaffold plank, wider than the car, and a 3" fence post screwed to that.
The scaffold plank was roped to the front wheels to make sure it could not slip backwards.
Bottle jacks were deployed by "raise a bit, prop with stands, raise some more" and repeat until bottle jacks were near to max.
Removed jacks, lower and re-insert on 4" thick pieces of fence post.
Repeated the "lift a bit, axle stand a bit more" process, until sufficient clearance was gained to wheel away the engine.
N.B. the front of the engine was heavy, so supported it on a trolley jack before disconnecting the front mount bolts and before the body lift began
During engine pull out "on road wheels", a helper pushed the trolley jack backwards (I'd use a small engine table on wheels in hindsight, strapped to the front subframe to avoid slippage.)
Clutch Pipe:
The clutch pipe uinder the car, even when disconnected, fouled the subframe on lifting the car.
I cut mine back a few inches and had a s/steel flexible made to replace the rubber original, with a swaged threaded end distant from the clutch slave. I flared the original pipe, which is now a bit shorter after cutting, and joined it to a 3 " length of cunifer pipe, attaching to the flexi threaded end. I pipe joined to this to the original pipe, ultimately secured to a "P" clip where the brake pipe is attached (actually used two "P" clips, one for brake and one for clutch pipes, in place of the original plastic dual pipe clip). Easy to disconnect if it the frame has to come out again.
Hydrolastic:
I depressured them by jubilee clipping a 5mm innder bore clear hose to the schrader valves at the front.
Using a 30mm steel panel pin, I punctured the pipe to press onto the valve core - releasing high pressure fluid down the pipe into a collecting bottle. The wheels end up inside the arches - the car rests on the bump stops! Do this before starting the "plank" jack up process.
Frame and suspension:
This was pressure hosed clean of muck, wire wheeled clean (power drill) and treated with Fertan. Washed off again after 48 hours. Two coats of black Hammerite left to dry for 12 hours before recoating. Then 48 hours resting before waxoyled inside and out. All new bolts were used for attachments each liberally coated in copper crease. Polybushed used in place of rubber - more copper grease! The front has already been done like this.
Engine and Gearbox:
I had stripped and rebuilt the engine (from a low miler crashed car). Now has MLS gasket, L/Rover oil rail, new water pump, belts, adjuster etc. It's a VVC and I even stripped the mech's and rebuilt them, relieving wear marks with oil soaked 1200 wet and dry. Dismantled and rebuilt every one of the 16 hydraulic valve lifters (soaked in gunk for 10 days). Guides, Spings and rings all OK. Renewed all exhaust valves, lapping these in along with inlets. A bit of porting done to the head to match the new s/s exhaust manifold and flexi.. Opened up and cleaned the rough waterways in the head (crap casting). Much research revelealed best way to retime the mechs and cams etc, without special tools. Dave Andrews site is excellent. Used a new Lambda sensor ( but in error got the later type for a pre&post cat, so had to drill out the boss in the manfold by 3mm to get it to fit). Transferred original wiring loom to "new" engine. Changed the clutch plate and release bearing. Replaced the gearshift seals, the drive shaft seals and the clutch arm shaft seal. The latter was treated to graphite grease before re-fitting to give it a chance of a long life ('cos you cant regrease it "in place" without fitting a Mike Satur special). MIG welded a wonky lower gearchange ball so it was tight once more. Threw away all hose connectors and replaced with s/steel jubilees. Discarded the thermostat and fitted a PRT (now that is really hard to do). It pays to work out what goes where and then dismantle. Fit the heater hose pipes to the car before dropping the car onto the frame/engine. Do the PRT and remaining hose work after the engine is in - one person on top and one underneath is best.. The main outlet hose is close to a sharp screw that attaches the heat shield to the rear bulk head and underneath one hose ends up close to the subframe. I used some old hose cut up and lashed with cable ties onto the real hoses, to act as "rub" protectors in these locations. I refurbished the metal pipes that go around the engine - more hammerite. S/steel underbody pipes to the radiator were already fiited last year.
Drive Shafts:
Be aware that there are early and late types of drive shaft. Later type shafts have a machined groove in the inboard end, opposite to the gaitor. Metal encased seals don't work with early shafts - you need black rubber type seals without external metal if you have early shafts and a later gearbox. Later type shafts will work with any type of gearbox or seal variant, but later gearboxes must have early type seals fitted if you use the early type shafts. When fitting shafts to gearbox, do use a seal protector tool - it's so much easier than messing with masking tape. Using no protection at all guarantees you will scratch the knife edge seal on the splines - and have an oil leak.
What's Next:
The engine started first time. Happy days! After a few coughs it ran perfectly. No diesel clattering sounds - really quiet! An excellent result. Quick blip to 7k rpm means I must have the vvc elements right.
Expecting a visit from the local liquid levers owner, to vacuum and pressurise the hydrolastics and she is ready for the road. Actually it's offf to the body shop next, to sort out a rusty wheel arch and the odd dent here and there. Perhaps it will have stopped raining by then, so I can enjoy the MGF summer. I've done all this on a DIY basis - over several weeks. If you want to have a go you''ll need a decent toolkit, patience and be prepared to do research on this and other forums/websites.
Acknowledgement:
Rep is due to CJJ, who's "how to " inspired me with the confidence to have a go.
Jeff
Please Log in or Create an account to join the conversation.
You are of course, absolutely right about the blue peter engine being the wrong way round.
Fortunately I had built a platform on castors, so getting the correct orientation before dropping the car onto the replacement lump wasn't too hard! Actually I constructed the platfom with some care in order that the car would settle onto the engine mounts equally, avoiding the need to jack one end higher than another. This made life a little easier with those blasted subframe bolts. They were s*ds to get out in one piece. I repeatedly used a blow torch, plus-gas and some hammering prior to starting to undo them. And then I tightened a 1/16 of a turn, slackened 1/8 and so on until they came out without damage. New bolts have been put into the front and the rears were re-used. Copious amounts of waxoyl was squirted up the empty holes, then oodles of copper grease on the bolts during the refit. I suppose they will fall out now they are so slippery. I have of course, torqued them up properly.
Jeff
Please Log in or Create an account to join the conversation.
Please Log in or Create an account to join the conversation.
Well done and I hope the car now gives you many years of trouble free motoring.
Please Log in or Create an account to join the conversation.
- talkingcars
-
 Offline
- Moderator
-

- Posts: 6876
- Thanks: 1296
When my mate had to drop the engine out of his beetle he tied a rope around the body and used a winch over a large branch on the oak tree in his garden to lift it up.
With the timber under the back of the car you'd be better to use 1 peice of 4x4 (100x100mm) rather than 2 bits of 2x4 (47x100mm).
Is there anywhere on the body 1 can attach an engine hoist to lift the body up?
Home to black Alfa Romeo 159 3.2 V6 Q4 ,green MGF VVC and red MG Maestro T16.
MG - the friendly marque.
Please Log in or Create an account to join the conversation.
During the "how to lift it" planning stage, I thought about using just a 4"x4" fence post and no plank, but got worried about the increasing angle between the bottle jack pad's and the woodwork during the lift. I feared the jacks might topple. Also I thought the axle stand jaws might slip on the plank as their contact gradually reduces to a single point the higher the car goes. Then I hit on the idea of screwing a smaller 3"x3" fence post to the plank so I could use either the plank or the post to lift with, as appropriate, and a 3" post suits the axle stand jaws better than a flat plank.. With little floor height to start with, the plank was used to lift on and then the fence post. Towards the end of the lift, the bottle jacks ran out of lift height, so I regained it using 4"x4" wood under them.Putting the jacks pads on the plank adjacent to the post reduces the risk of them toppling over. Finally, an 8" plank spreads the weight better than 4" and it's roped to the front wheels, so it cannot slip back. I may be right or wrong with my reasoning, but I have to say it all worked very well (and bottle jacks are not expensive). I re-iterate that during every inch or two of lift, axle stands was introduced. By using two pairs, there was alway one set ready to catch the car dropping, whilst the other pair were adjusted to the new lift height. At end of lift just a pair of stands were left in place as well as the bottle jacks.
Woodwork dimensions: plank at 19cm x 5cm (8" x 2") and a (screwed on) fence post at 3"x3" - a total of 5" depth.
Please Log in or Create an account to join the conversation.

