3 Points Coolant Bleed Procedure

MG F/TF - 3 Points Coolant Bleed Procedure was created by Roverlike
Posted 1 year 8 months ago #209064
3 Points Coolant Bleed Procedure
____________________________
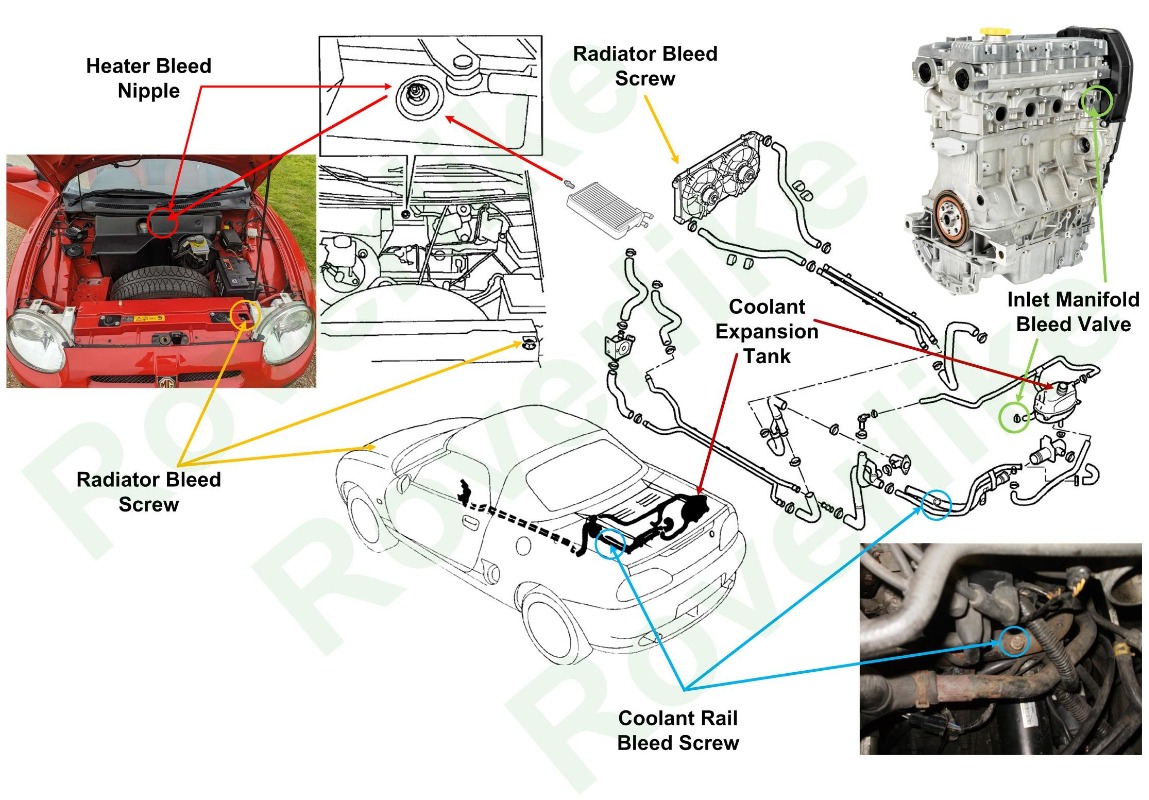
1. Ensure all hose connections are tight following any engine repair or service coolant drain.
2. Locate the inlet manifold bleed valve (green color circled on the picture) and remove bleed hose from valve. Connect a suitable tube to the valve spout and blow through to ensure valve pin is not sticking. Remove tube from valve spout, refit bleed hose and secure with clip.
NOTE: Inlet manifold bleed valve pins are prone to sticking to their seats, freeing this pin will allow air to bleed from the cylinder head during coolant fill.
3. Turn heater temperature control to maximum heat position.
4. Remove bleed screw and sealing washer from the radiator and open heater bleed nipple (yellow and red circled on the picture).
5. Prepare coolant to required concentration.
6. Fill system slowly until a steady flow of coolant is emitted from the bleed point.
7. Refit radiator bleed screw an tighten to 5 Nm, Tighten bleed heater nipple to 7 Nm
8. Continue filling system until coolant level reaches the expansion tank neck.
9. Models with A/C; Ensure air conditioning is switched off.
10. With expansion tank cap off, start and run engine at 1500 – 2500 rev/min. Fill expansion tank as necessary to maintain coolant level just below expansion tank neck. When coolant starts to rise up expansion tank neck, due to heat expansion, fit expansion tank cap.
11. Continue running engine at 1500 – 2500 rev/min until cooling fan comes on, then run engine at idle speed until cooling fan stops.
12. Switch off engine and allow to cool for 30 minutes.
13. Check cooling system for leaks.
14. Remove expansion tank cap and, if necessary, top-up coolant to MAX level.
WARNING: Do not remove the filler cap from the coolant expansion tank while the system is hot.
15. Refit expansion tank cap.
Additional bleed
16. Allow engine to cool.
17. Release clip and remove inlet air hose from throttle housing.
18. Top-up the expansion tank.
19. Remove bleed screw from radiator return rail (blue circled on the picture).
20. When a constant flow of coolant is being emitted from bleed point, fit bleed screw and tighten to 9 Nm.
21. Fit inlet hose throttle housing and secure with clip.
22. Check level of coolant, top-up to ‘MAX’ mark on expansion tank if necessary. [/center][/center]
____________________________
| Radiator bleed screw | Coolant rail bleed screw | Heater matrix bleed screw | |||
| Thread size |
M12
|
M6
| |||
| Pitch | 1.25 mm | 1 mm | |||
| Washer | YES | NO | NO | ||
| Part number | PYP100500 | JHN100010 |
1. Ensure all hose connections are tight following any engine repair or service coolant drain.
2. Locate the inlet manifold bleed valve (green color circled on the picture) and remove bleed hose from valve. Connect a suitable tube to the valve spout and blow through to ensure valve pin is not sticking. Remove tube from valve spout, refit bleed hose and secure with clip.
NOTE: Inlet manifold bleed valve pins are prone to sticking to their seats, freeing this pin will allow air to bleed from the cylinder head during coolant fill.
3. Turn heater temperature control to maximum heat position.
4. Remove bleed screw and sealing washer from the radiator and open heater bleed nipple (yellow and red circled on the picture).
5. Prepare coolant to required concentration.
6. Fill system slowly until a steady flow of coolant is emitted from the bleed point.
7. Refit radiator bleed screw an tighten to 5 Nm, Tighten bleed heater nipple to 7 Nm
8. Continue filling system until coolant level reaches the expansion tank neck.
9. Models with A/C; Ensure air conditioning is switched off.
10. With expansion tank cap off, start and run engine at 1500 – 2500 rev/min. Fill expansion tank as necessary to maintain coolant level just below expansion tank neck. When coolant starts to rise up expansion tank neck, due to heat expansion, fit expansion tank cap.
11. Continue running engine at 1500 – 2500 rev/min until cooling fan comes on, then run engine at idle speed until cooling fan stops.
12. Switch off engine and allow to cool for 30 minutes.
13. Check cooling system for leaks.
14. Remove expansion tank cap and, if necessary, top-up coolant to MAX level.
WARNING: Do not remove the filler cap from the coolant expansion tank while the system is hot.
15. Refit expansion tank cap.
Additional bleed
16. Allow engine to cool.
17. Release clip and remove inlet air hose from throttle housing.
18. Top-up the expansion tank.
19. Remove bleed screw from radiator return rail (blue circled on the picture).
20. When a constant flow of coolant is being emitted from bleed point, fit bleed screw and tighten to 9 Nm.
21. Fit inlet hose throttle housing and secure with clip.
22. Check level of coolant, top-up to ‘MAX’ mark on expansion tank if necessary. [/center][/center]
Last Edit:4 months 14 hours ago
by Roverlike
Last edit: 4 months 14 hours ago by Roverlike.
Please Log in or Create an account to join the conversation.

Thank you for detailing this and the clarity.
As I will probably attempt to renew the coolant hoses this is very useful information for me.
I am a little puzzled why there is a need to remove the air hose for the additional bleed. Is that to aid access or something more fundamental?
As I read and it and try to ensure I have all the detail in this procedure can you also clarify the following please?
After completing the initial bleeding steps and allowing the engine to cool experience suggests that any residual air collects in cavities that can be vented by releasing the bleed screw in the water rail. Is that correct?
Have I understood correctly that the additional bleed is performed without starting the engine?
How long should it take to release any residual entrained air? In other words how much should I expect to have to top up the header tank please?
by Delbourt
Please Log in or Create an account to join the conversation.
You do not need to remove air hose if you can reach bleeding point on coolant rail. However I doubt you will be able to reach bleed point on coolant rail without removing the air hose.Thank you for detailing this and the clarity.
As I will probably attempt to renew the coolant hoses this is very useful information for me.
I am a little puzzled why there is a need to remove the air hose for the additional bleed. Is that to aid access or something more fundamental?
As I read and it and try to ensure I have all the detail in this procedure can you also clarify the following please?
After completing the initial bleeding steps and allowing the engine to cool experience suggests that any residual air collects in cavities that can be vented by releasing the bleed screw in the water rail. Is that correct?
Have I understood correctly that the additional bleed is performed without starting the engine?
How long should it take to release any residual entrained air? In other words how much should I expect to have to top up the header tank please?
Yes, additional bleeding allows of any residual air from the engine to be released this way. It is done without starting the engine. How long - until you have constant flow of coolant, without interruption of potential air. If you see that header tank starts to empty, do not allow it to go lower then MIN mark. You need to top it up to MAX mark, and there should be when whole process is finished.
by Roverlike
Please Log in or Create an account to join the conversation.
- generous_dad
-
 Offline
- Time served MGer
-

Site Supporter
- Posts: 329
- Thanks: 59
Replied by generous_dad on topic 3 Points Coolant Bleed Procedure
Posted 1 year 8 months ago #209068
Roverlike. I love the clarity. Something I will be doing next summer.
Thank you. Surely it is worthy of the How to Guides section if not there already.
Thank you. Surely it is worthy of the How to Guides section if not there already.
by generous_dad
Please Log in or Create an account to join the conversation.

Thank you for such a detailed explanation and for pointing out the 3 airing points.
This is a very valuable How To.
I'm an ex mechanic and I came here to learn from MG enthusiasts who know these cars inside out and are willing to pass on their knowlege to others. My TF will benifit from it.
Thank you.
This is a very valuable How To.
I'm an ex mechanic and I came here to learn from MG enthusiasts who know these cars inside out and are willing to pass on their knowlege to others. My TF will benifit from it.
Thank you.
by TA22GT
Please Log in or Create an account to join the conversation.
Do be careful when doing/undoing the bleed screw on the radiator, being plastic it is easy to strip the thread or round the head off.
So DON'T use a bloody shifter (adjustable spanner) actually you should never use these stupid contraptions anyway.,,,,,,,Woe betide any apprentice of mine who was caught with one of these instruments of Satan in their posession! They would come back from lunch to find the horrid thing brazed to their tool box, it would have to remain there for the rest of their time as an apprentice, as a reminder to always use the correct tool for the job!

There is actually a legitimate use of shifters but it doesn't involve nuts and bolts....it is permissable to use large shifter in fabrication work as a bending tool to grip red hot metal.
So DON'T use a bloody shifter (adjustable spanner) actually you should never use these stupid contraptions anyway.,,,,,,,Woe betide any apprentice of mine who was caught with one of these instruments of Satan in their posession! They would come back from lunch to find the horrid thing brazed to their tool box, it would have to remain there for the rest of their time as an apprentice, as a reminder to always use the correct tool for the job!
There is actually a legitimate use of shifters but it doesn't involve nuts and bolts....it is permissable to use large shifter in fabrication work as a bending tool to grip red hot metal.
"Keep calm, relax, focus on the problem & PULL THE BLOODY TRIGGER"
Last Edit:4 months 9 hours ago
by Cobber
Last edit: 4 months 9 hours ago by Cobber.
Please Log in or Create an account to join the conversation.
- Airportable
-
 Offline
- Master MGer
-

Site Supporter
- Posts: 3675
- Thanks: 912
I was co-opted by my lad to be on hand whilst he stripped & retrieved a log splitter. It was a bit on the big side, to a point where I was a little worried about my engine hoist, which was in a staring role.
I was asked to disconnect the 3phase power pack & pump & presented with two adjustable spanners & what might have started life as a screwdriver.
Fortunately my lad got to me with the correct spanners before I resigned.
Adjustable spanners have their uses, but only if a proper hammer isn’t available.
Right, back to the subject in hand. The plastic radiator bleed point is easily damaged, however it’s better to damage the thread on the cap rather than ripping the thread out of the radiator.
If you’re confident in your abilities a domestic radiator blanking plug in either stainless & plated steel is better & cheaper, on last inspection, than one from Xpart.
Access to the heater bleed nipple hiding behind the bulkhead shield usually means removing the shield. If however you drill a hole in it on axis with the nipple, you can bleed that without the fag of removing it.
The engine bleed screw, which is M6, I have replaced with a digital thermometer probe, the readout is in the car. By using the probe wire as a guide I can bleed that point without having to take the inspection cover off.
I also know within a few degrees what temperature the coolant is in the galleries.
M
by Airportable
Please Log in or Create an account to join the conversation.
- David Aiketgate
-
 Offline
- David
-

Super Users
- mgf mk2 freestyle mpi 16" wheels, in Anthracite.
- Posts: 20627
- Thanks: 4583
Replied by David Aiketgate on topic 3 Points Coolant Bleed Procedure
Posted 1 year 8 months ago #209075Adjustable spanners have their uses, but only if a proper hammer isn’t available.
M
David Aiketgate wrote:-
A quote worthy of being posted to any garage wall!
David

Please Log in or Create an account to join the conversation.
Time to create page: 0.406 seconds