
Bodywork
- Notanumber
-
 Offline
- Qualified MGer
-

- Posts: 845
- Thanks: 128
Well done Len. You have done some very careful reshaping there. Can't wait to see the painted result
2003 TF 135 sunstorm
by Notanumber
The following user(s) said Thank You: MGB281
Please Log in or Create an account to join the conversation.
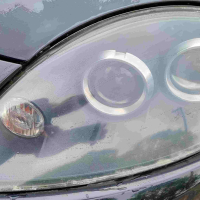
Morning,I thought it was ready for spraying,but running your fingers over the area,you can feel slight ridges .So another skimming of filler and more flatting When a light is held at an angle to the area filled its possible to see the slight undulations .If they are not done on prep.then they will show up with gloss coat The point is as well I bought the MG to have project to do so how long it takes doesn`t matter Len .
by digcot65
Please Log in or Create an account to join the conversation.
- Notanumber
-
Offline
- Qualified MGer
-
- Posts: 845
- Thanks: 128
It can be painstaking but well worth it as the quality of the end result of the other paintwork you have done goes to prove
2003 TF 135 sunstorm
by Notanumber
Please Log in or Create an account to join the conversation.
Hello three coats of filler primer and a quick rub down ,with 800 and it looks quite good However its not until you spray the gloss on it as to whether its good or not .But cross fingers and see. I sprayed all of the N/S while I was at it ,after hours of flatting .
 Len
Len
by digcot65
Please Log in or Create an account to join the conversation.
- Notanumber
-
Offline
- Qualified MGer
-
- Posts: 845
- Thanks: 128
Seeing your success with this Len is making me more confident to tackle the paint on my MGB project car.
2003 TF 135 sunstorm
by Notanumber
Please Log in or Create an account to join the conversation.
Morning I went to a car restoration show some years ago,there was a stand there from a college ,that taught paint spraying.The man on the stand said the biggest mistake people make when they first start spraying , is not to go over the panels once,but to go over it a couple of times .So making the paint run,even now I have to hold myself back from spraying an area a couple of times .Just go over the panel once,making sure you overlap the spray lines .The other fault which all beginners make is not to give the coats time to dry off ,he said actual time yourself giving at least 5-10 minutes between coats.It was when I looked at my watch I realised I wasn`t giving it time Show another photo when I give it the final coats.yet again the masking coat from a spray can of silver has shown some defects Len
by digcot65
The following user(s) said Thank You: David Aiketgate, Airportable
Please Log in or Create an account to join the conversation.
- Notanumber
-
Offline
- Qualified MGer
-
- Posts: 845
- Thanks: 128
Many happy returns for yesterday Len. That cant be right though, I'd have placed you at 10 years younger.
2003 TF 135 sunstorm
by Notanumber
Please Log in or Create an account to join the conversation.
- Airportable
-
 Offline
- Senior MGer
-

- Posts: 1910
- Thanks: 431
Four score years & six, Len’s just getting the revs up, when it’s four score & ten + , then your motoring. I’m rebuilding a pair of four pot AP’s for a friend & I’ve been making stainless pins as the originals are rubbish. Stood up at my lathe all afternoon & that’s after having taken the looong route to the opticians with the blueish sky being the overhead limit. No change from last time so no new glasses to break.
M
M
by Airportable
Please Log in or Create an account to join the conversation.
- Notanumber
-
Offline
- Qualified MGer
-
- Posts: 845
- Thanks: 128
The original standard mild steel pins in the AP's are definitely a weak point for maintenance as they rust weld themselves in place, especially at the end that is an interference fit. Stainless ones avoid that completely. I went the route of using the Mike Satur designed stainless pins that use cotter pins at both ends so avoid the need for an interference fit but they did need a small modification to the caliper to fit. They happened to come up first in a search, otherwise I would have gone for a stainless version of the standard interference fit pins .
2003 TF 135 sunstorm
by Notanumber
Please Log in or Create an account to join the conversation.
- Airportable
-
Offline
- Senior MGer
-
- Posts: 1910
- Thanks: 431
The major problem with stainless into aluminium alloy is the corrosion cell which the two dissimilar metals create & the grot generated. If you are unaware of the problem you could be in an equally difficult situation as with the original design. I too am using stainless but will mitigate the problem by using copper grease, however my design has a Allen socket headed screw running through the calliper halves, the position of which can be tweaked whilst doing your wheel checks, ensuring their freedom when they are required to be removed.
There are a couple of stainless designs that I’m aware of, the Satur design & a second, not dissimilar to mine, which I found on eBay. Needless to say the second would be my choice as the “R” clips on the Satur design can be a fiddle & unlike the nuts used on the other, they could ping across the garage floor & under shelving that can’t be moved.
The difference between mine & the eBay offering is I have integrated the receiving thread into the rear calliper half, as opposed to a nut, which will make pad removal very straight forward.
M
by Airportable
Please Log in or Create an account to join the conversation.
Time to create page: 0.557 seconds